Setup guide

Set up your QAiry environment

Everything you need to go from the installation package to your first scheduled audience. Start in Salesforce Marketing Cloud, then finish the setup inside QAiry.

12 steps in two parts Who: a Marketing Cloud administrator Where: Marketing Cloud Engagement, then QAiry
Part 1

Install QAiry in Marketing Cloud

QAiry runs inside Salesforce Marketing Cloud Engagement as an installed package. These five steps are done once, by a Marketing Cloud administrator.

1

Check the prerequisites

  • You have administrator access to your Marketing Cloud account.
  • You are logged out of all Marketing Cloud sessions before you start.
  • If you use Chrome, clear your cookies to avoid authentication issues.
2

Install the package

  1. Request your install link and open it.
  2. Sign in to Marketing Cloud if you are asked to.
  3. Click Install Package.

You can check the result at any time in Marketing Cloud under Setup, Installed Packages.

3

Activate the package on the business units you need

Marketing Cloud: Setup, Installed Packages, QAiry, Access

The package is only available in the business units where you enable it. In the Access section, select every business unit that will use QAiry.

  • Always include the parent business unit.
  • Add each child business unit where your team builds audiences.
How many business units?

The number of business units and users included depends on your plan. See pricing.

4

Give your users access

Marketing Cloud: Setup, Installed Packages, QAiry, Access

In the same Access section, grant the package to the users who will work in QAiry. Only users with access see QAiry in their Marketing Cloud menu.

  • Give access to the people who build, review or schedule audiences.
  • What each person can do inside QAiry is set later with roles, in step 10.
5

Open QAiry from the parent business unit first

Marketing Cloud: AppExchange, QAiry
  1. Refresh Marketing Cloud and switch to your parent business unit.
  2. Open AppExchange, then QAiry. You are signed in automatically with your Marketing Cloud user.
  3. Then switch to each child business unit and open QAiry there once. This registers the business unit in QAiry.
Parent business unit first

If your account has a parent business unit, install and log in from the parent before you open QAiry in any child business unit. Otherwise the installation may not work correctly.

The first person who opens QAiry becomes its Administrator.

Part 2

Set up your workspace inside QAiry

QAiry writes better audiences when it knows your data. Connect your Data Extensions, tell QAiry how they join, and describe your business. Follow the steps in order: each one builds on the previous one.

The screenshots show a demo workspace with sample data. Click a screenshot to open it full size.

6

Check your business units

QAiry: Settings, Manage your business unit

Every business unit you opened QAiry from appears here as a card with its name and MID. The one you are working in shows Currently in use.
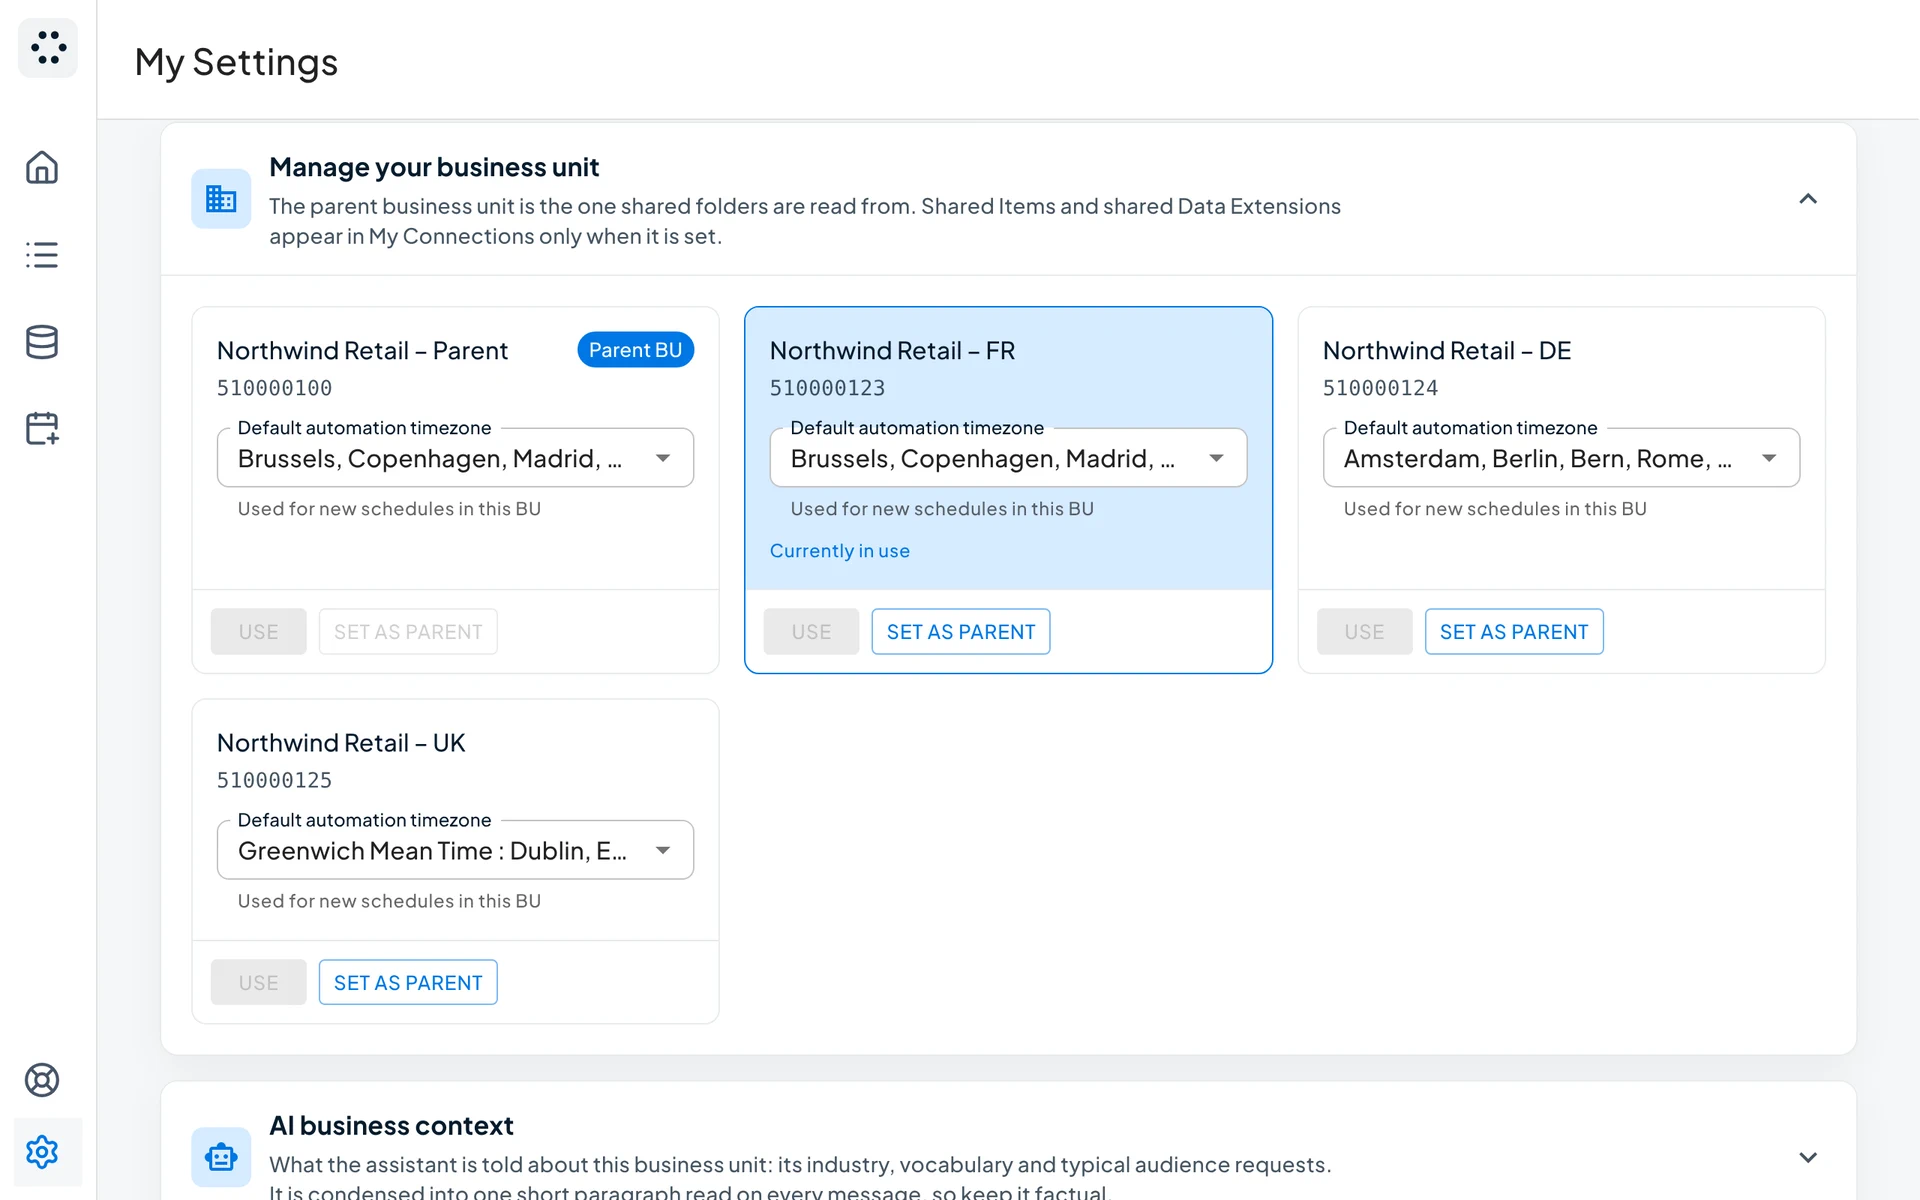
  1. Check that the right business unit carries the Parent BU label. If not, click Set as parent on the business unit that holds your shared folders.
  2. On each card, set the Default automation timezone. New schedules in that business unit start with this timezone.
QAiry Settings, Manage your business unit: four business unit cards with their MID, the Parent BU label, the business unit currently in use and a default automation timezone on each card
Manage your business unit. One card per business unit, with the parent label, the one in use and its default timezone.
Why the parent matters

Shared Items and shared Data Extensions are read from the parent business unit. They only appear in QAiry once a parent is set.

To work in another business unit, switch business unit in Marketing Cloud and open QAiry again.

7

Connect your Data Extensions

QAiry: Datamodel (My Connections)

Nothing is imported automatically. You choose which Data Extensions QAiry can use, and you describe them so the AI understands what they contain.
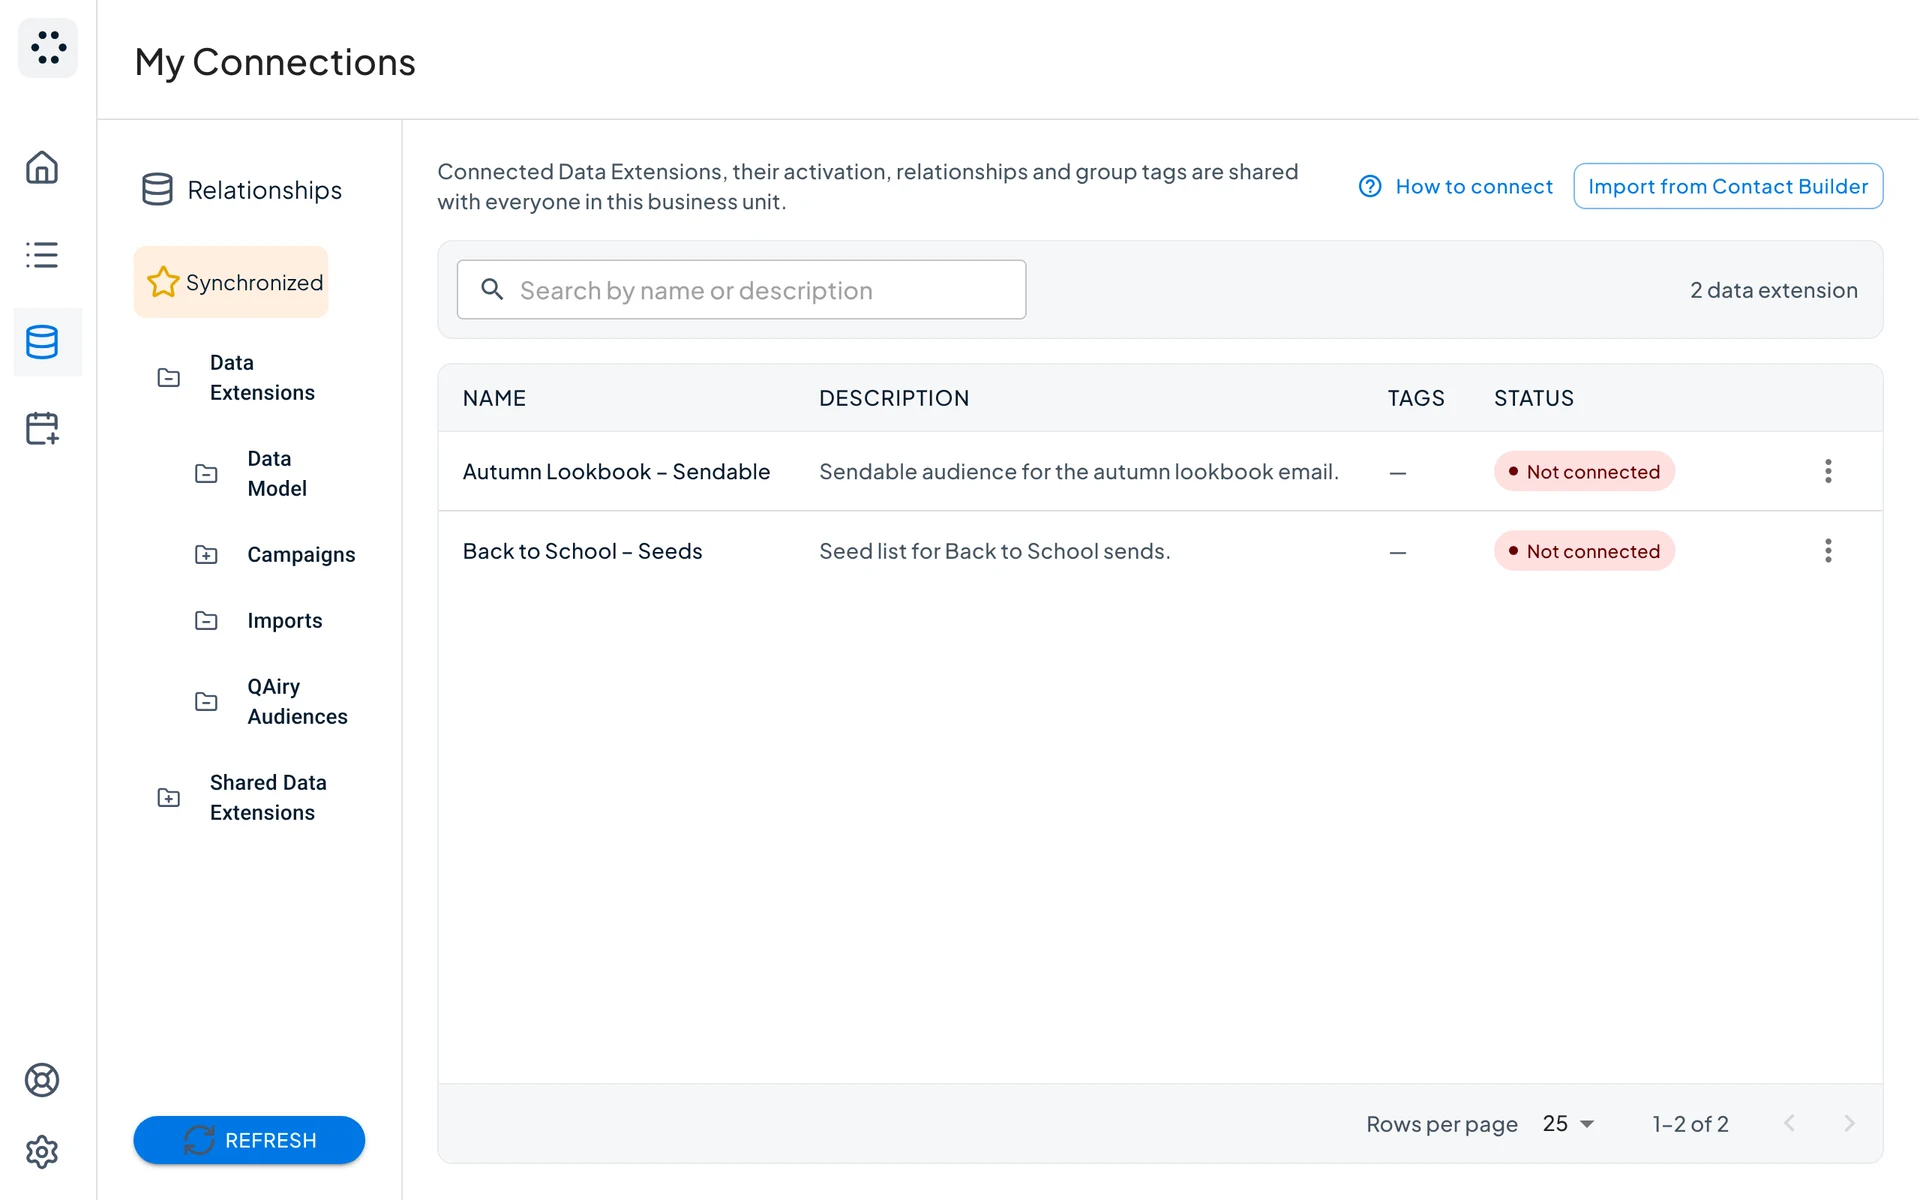
  1. Browse your Marketing Cloud folders on the left and open a folder.
  2. On a Data Extension, open the menu and choose View.
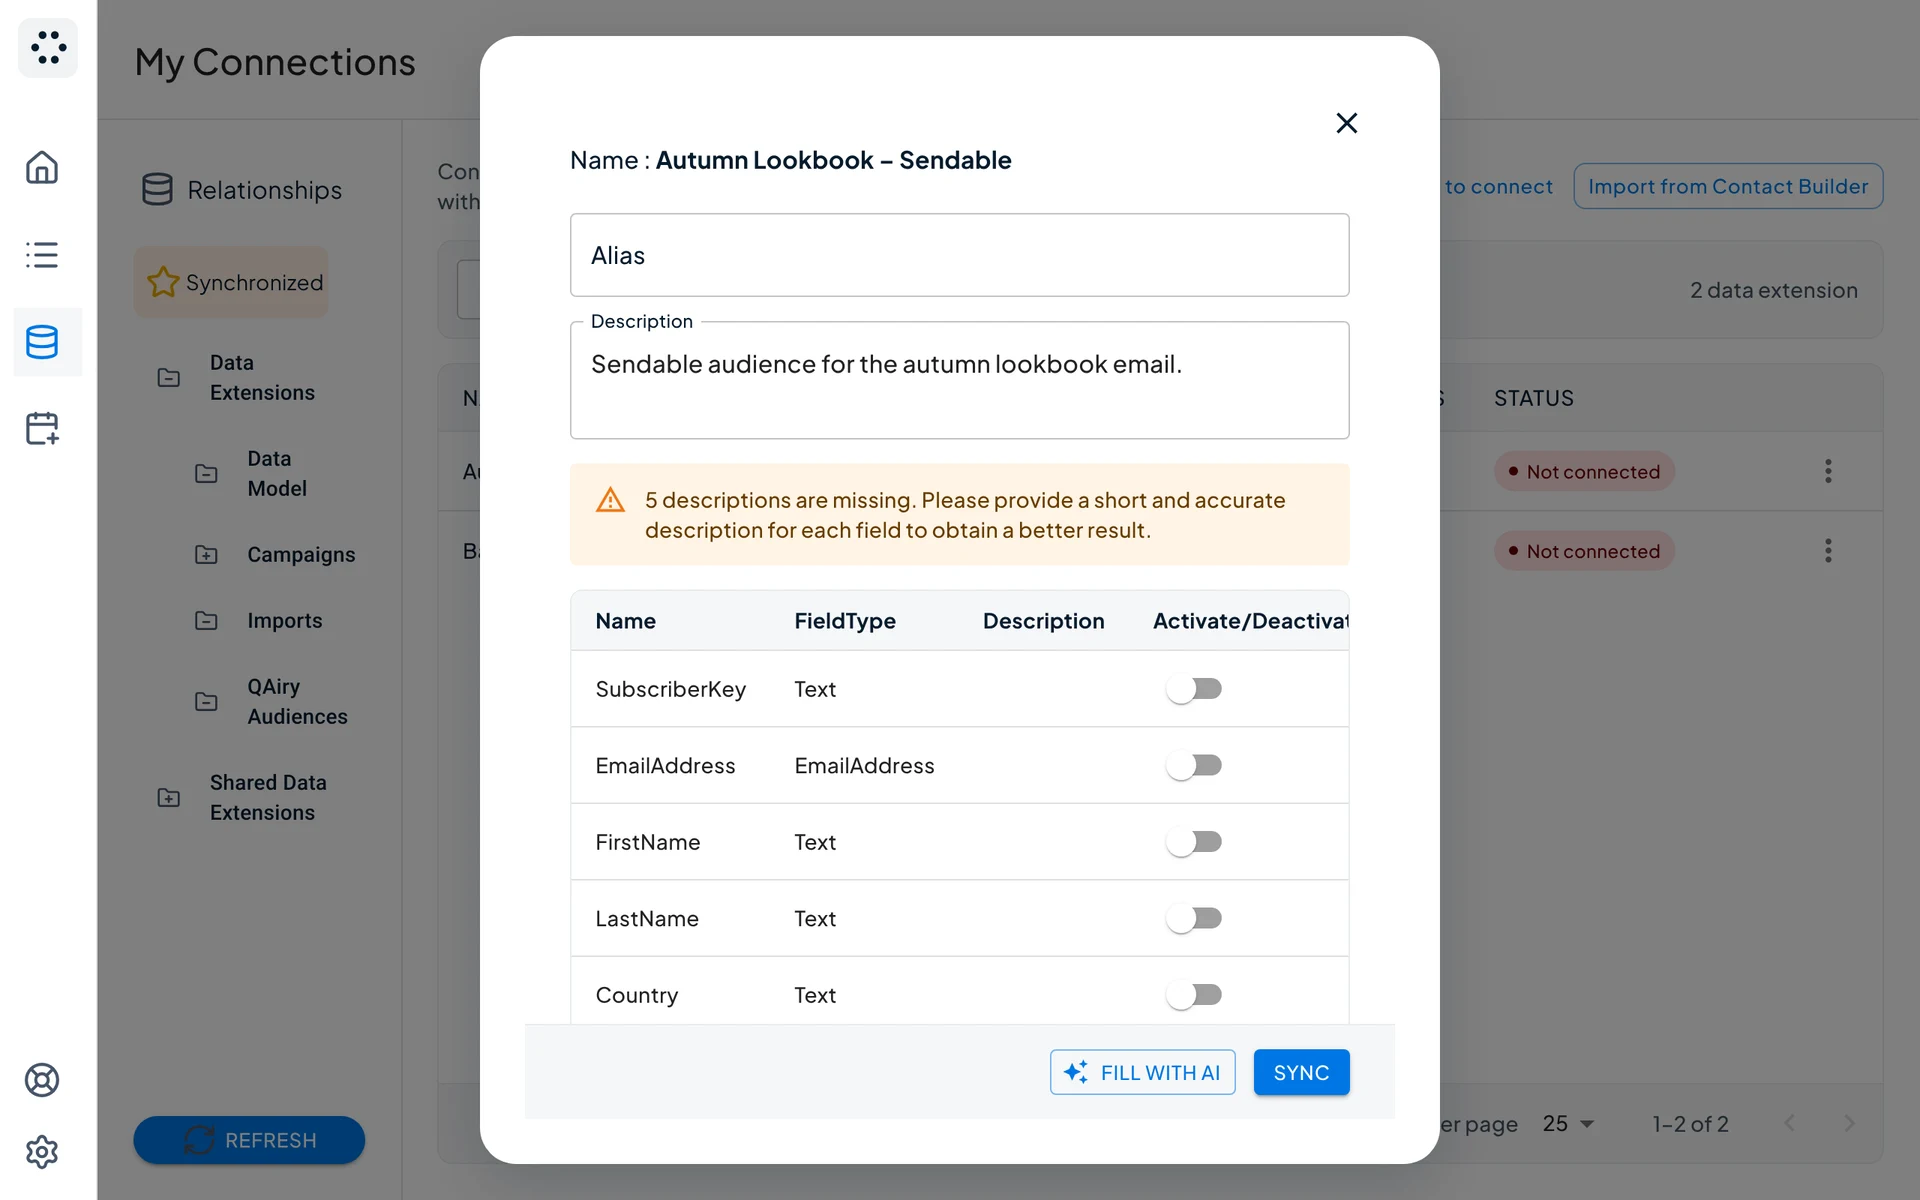
  3. Fill in the Description (required) and, if useful, an Alias.
  4. Review the description of each field. Click Fill with AI to draft the missing ones, then correct them.
  5. Click Sync. The status changes to Connected.
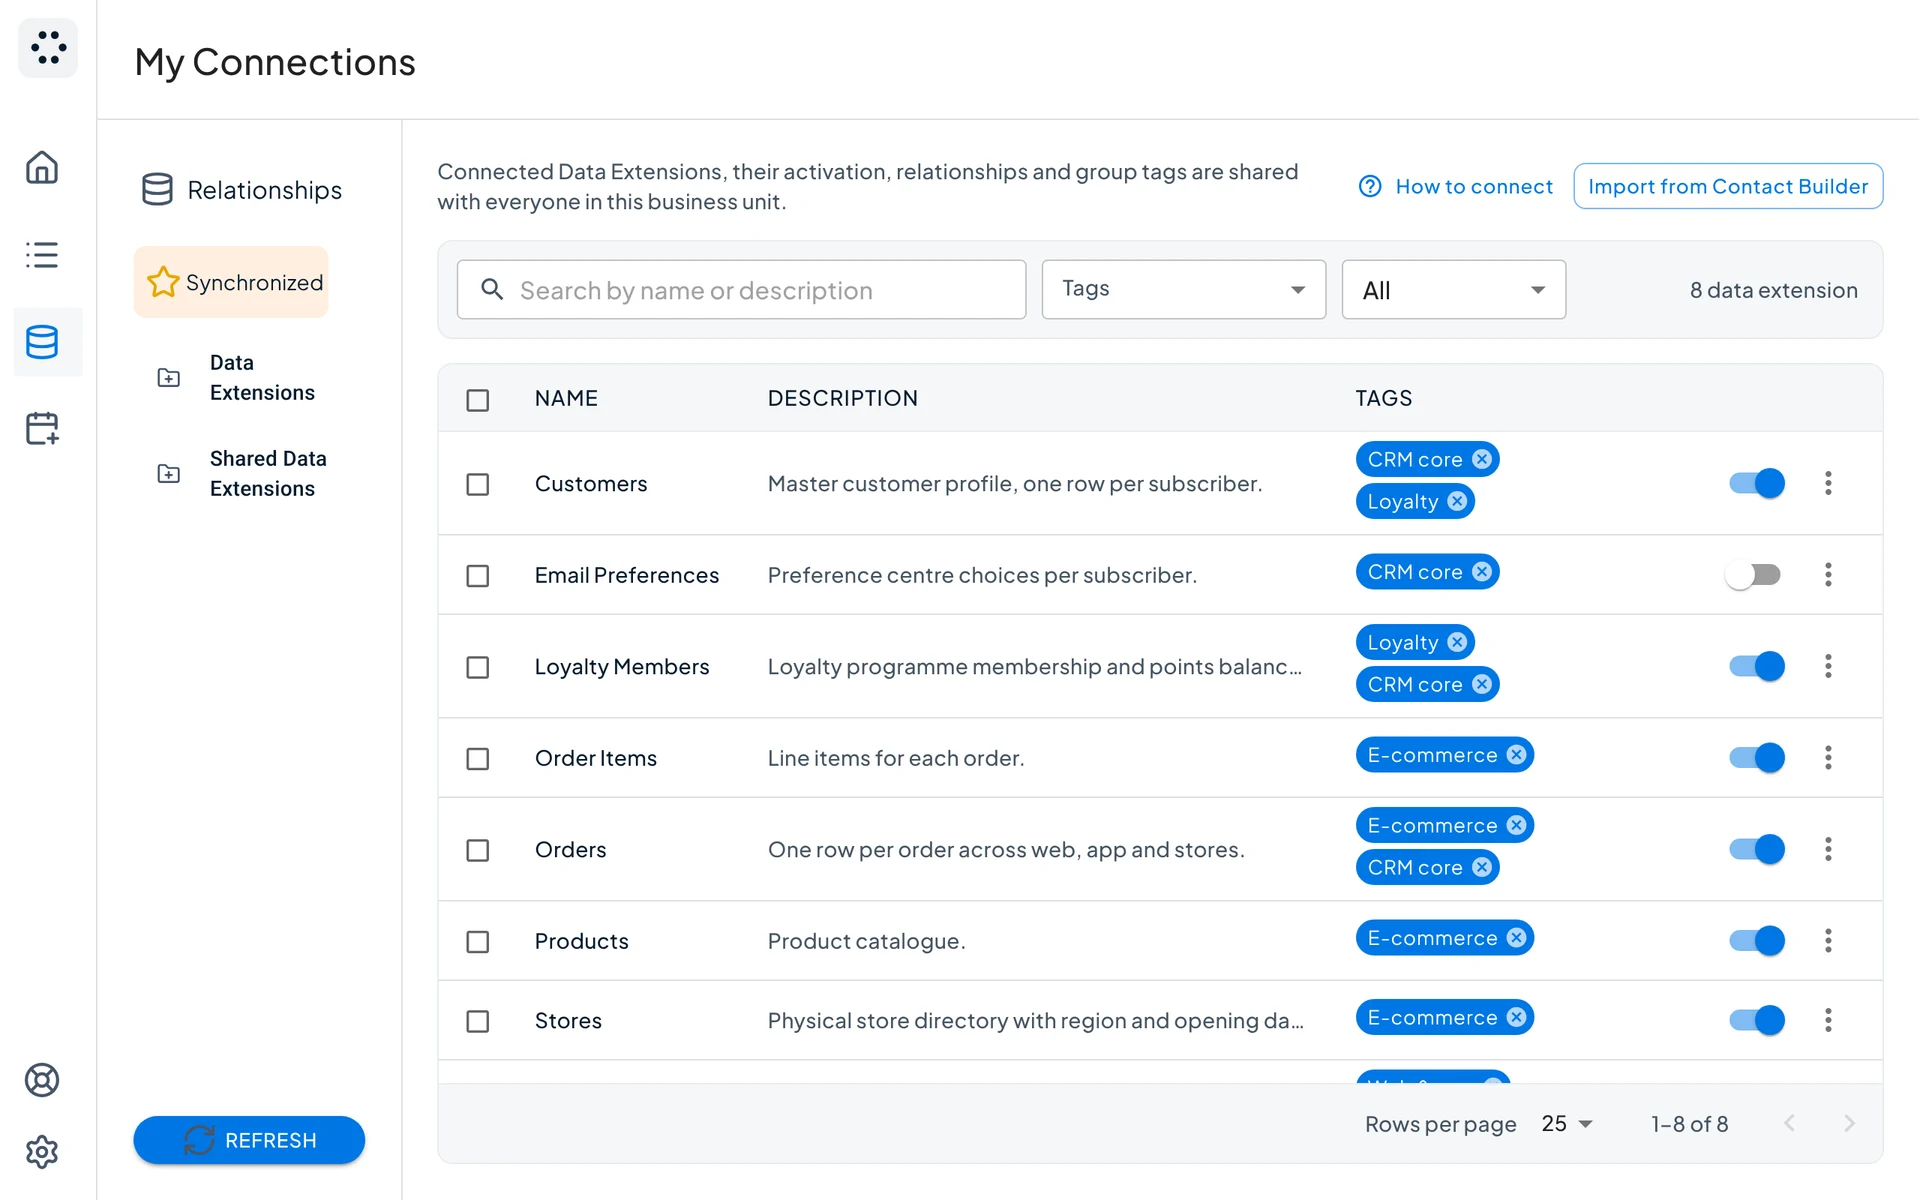
  6. Open Synchronized and switch on the Data Extensions the AI should use.
QAiry My Connections: Marketing Cloud folders on the left and the Data Extensions of the open folder, each with a description and a Not connected status
Steps 1 and 2. Your Marketing Cloud folders on the left. The status shows which Data Extensions are not connected yet.
QAiry Data Extension details: alias, description, the list of fields with their type and description, a warning that 5 descriptions are missing, and the Fill with AI and Sync buttons
Steps 3 to 5. Describe the Data Extension and its fields, then click Sync. QAiry tells you how many field descriptions are missing.
QAiry Synchronized list: eight connected Data Extensions with their description, group tags and a switch to make each one available to the AI
Step 6. The Synchronized list: connected Data Extensions, their tags, and the switch that makes each one available to the AI.
  • Descriptions matter. Short, accurate descriptions of tables and fields are what the AI reads to pick the right data.
  • Data Views need no setup. Sends, opens, clicks and bounces are always available.
  • Tags are optional. Group connected Data Extensions with tags to limit a request to one group.
  • After a change in Marketing Cloud, click refresh to reload folders and fields.
8

Define the relationships

QAiry: Datamodel (My Connections), Relationships

A relationship tells QAiry which fields join two Data Extensions, so it can write correct SQL.
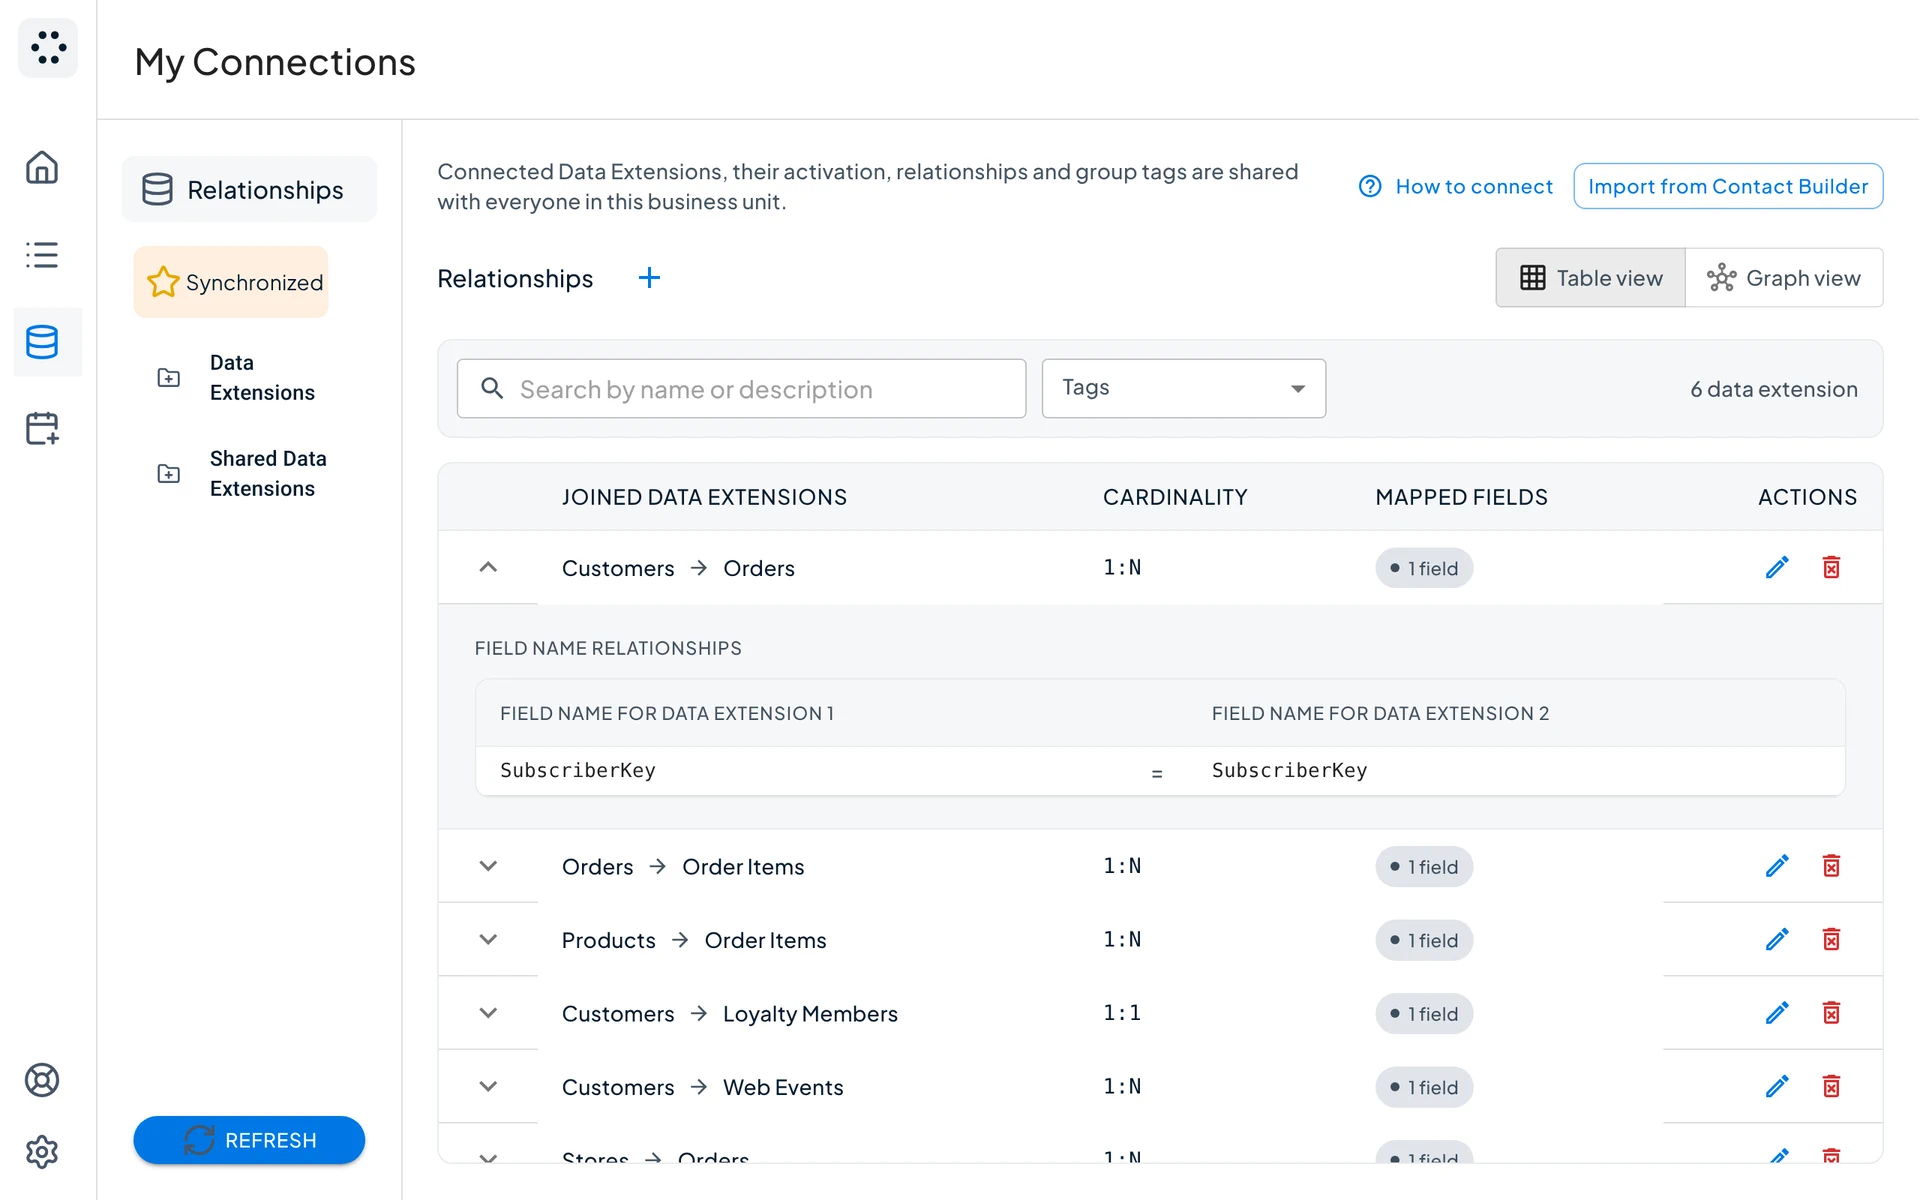
  1. Click the + button to create a relationship.
  2. Choose the two Data Extensions. Only connected Data Extensions are listed.
  3. Choose the cardinality: One-to-one, One-to-many or Many-to-many.
  4. Map the joining fields. One pair is required, and you can add up to five.
  5. Click Create.
QAiry Relationships in Table view: six relationships with the joined Data Extensions, their cardinality and mapped fields. The first row is open and shows SubscriberKey mapped to SubscriberKey
Table view. Each row is one relationship. Open a row to see the fields that join the two Data Extensions.

Switch between Table view and Graph view to check your data model at a glance.
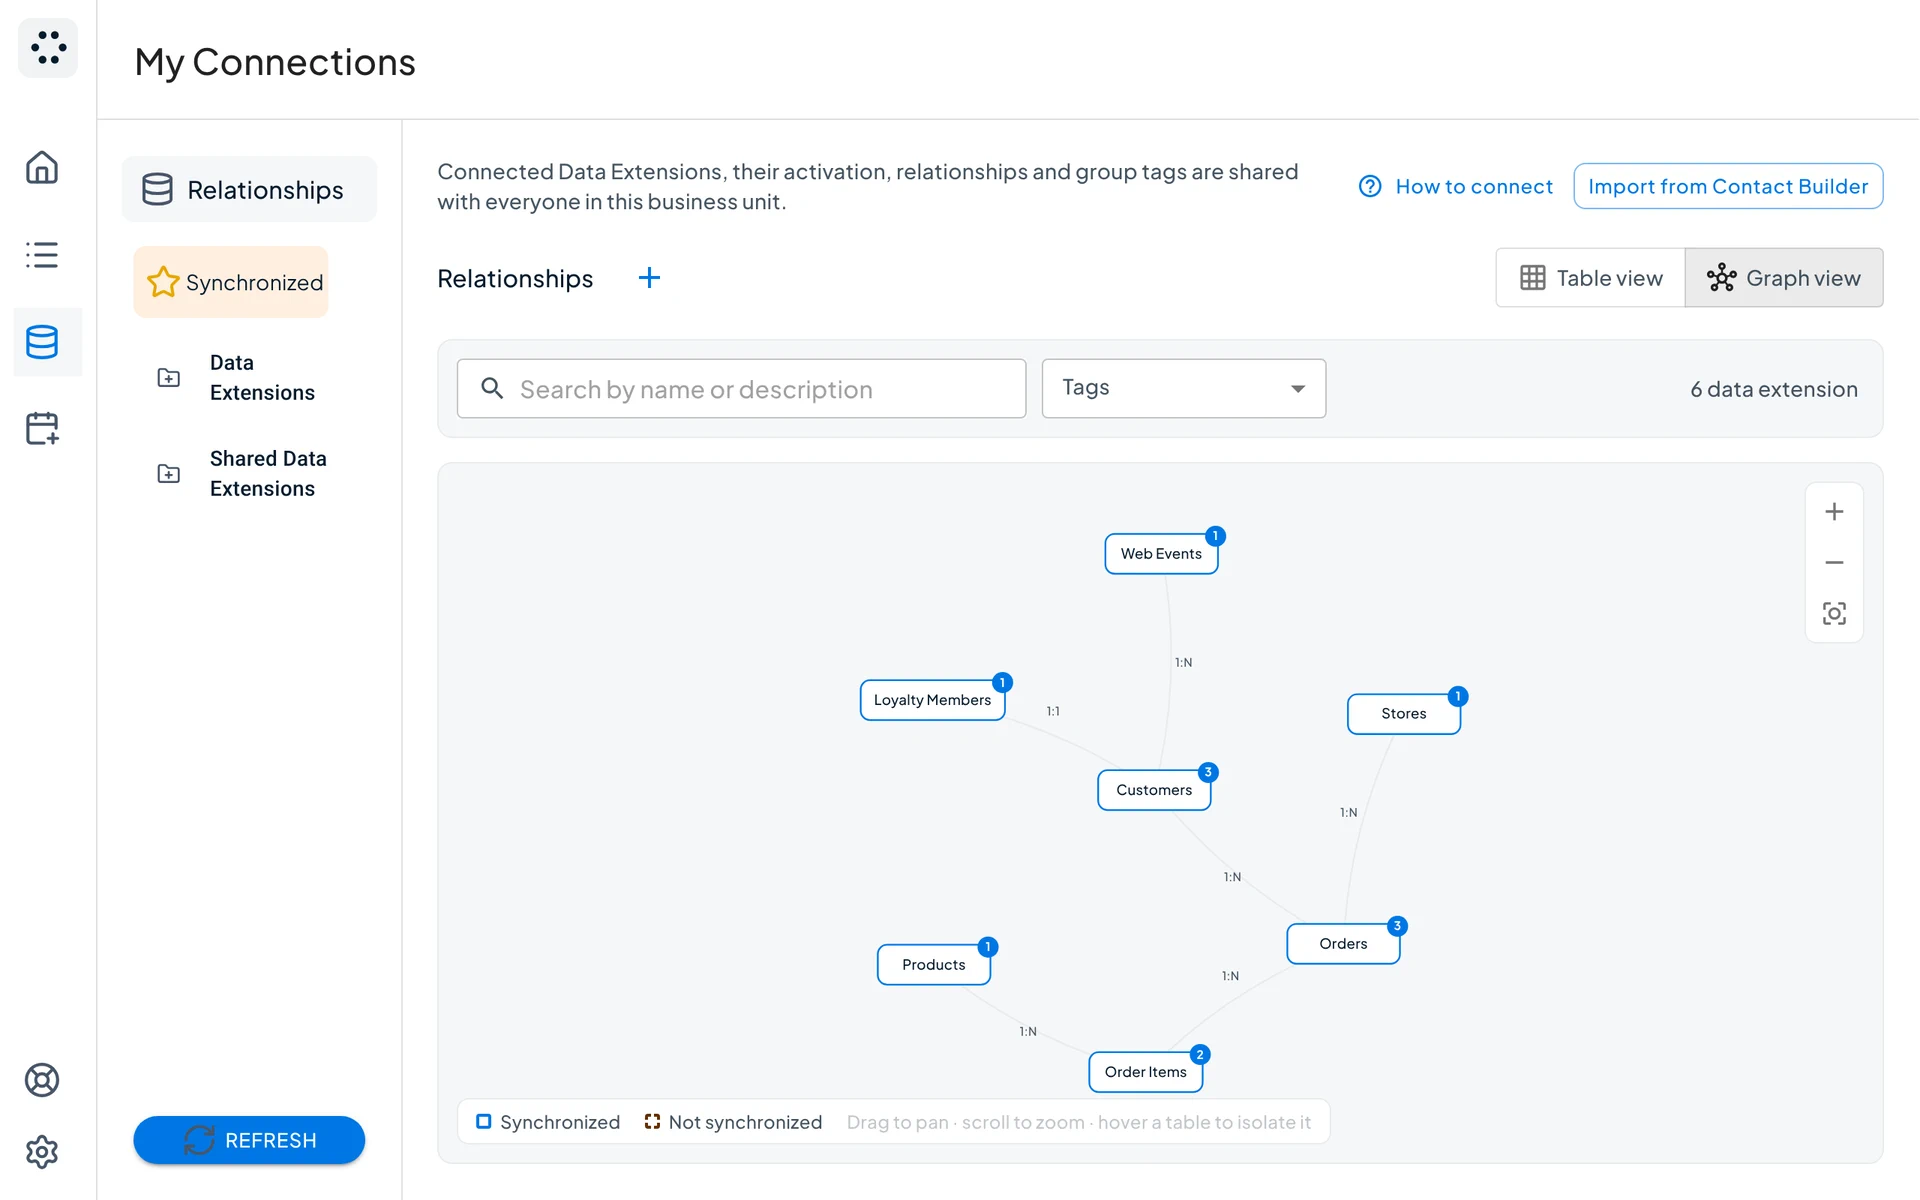
QAiry Relationships in Graph view: Data Extensions drawn as boxes, linked by lines labelled with the cardinality of each relationship
Graph view. The same relationships as a map of your data model.
9

Describe your business to the AI

QAiry: Settings, AI business context

The business context is what the assistant is told about each business unit: its industry, vocabulary and typical audience requests. It is read on every message, so keep it factual.
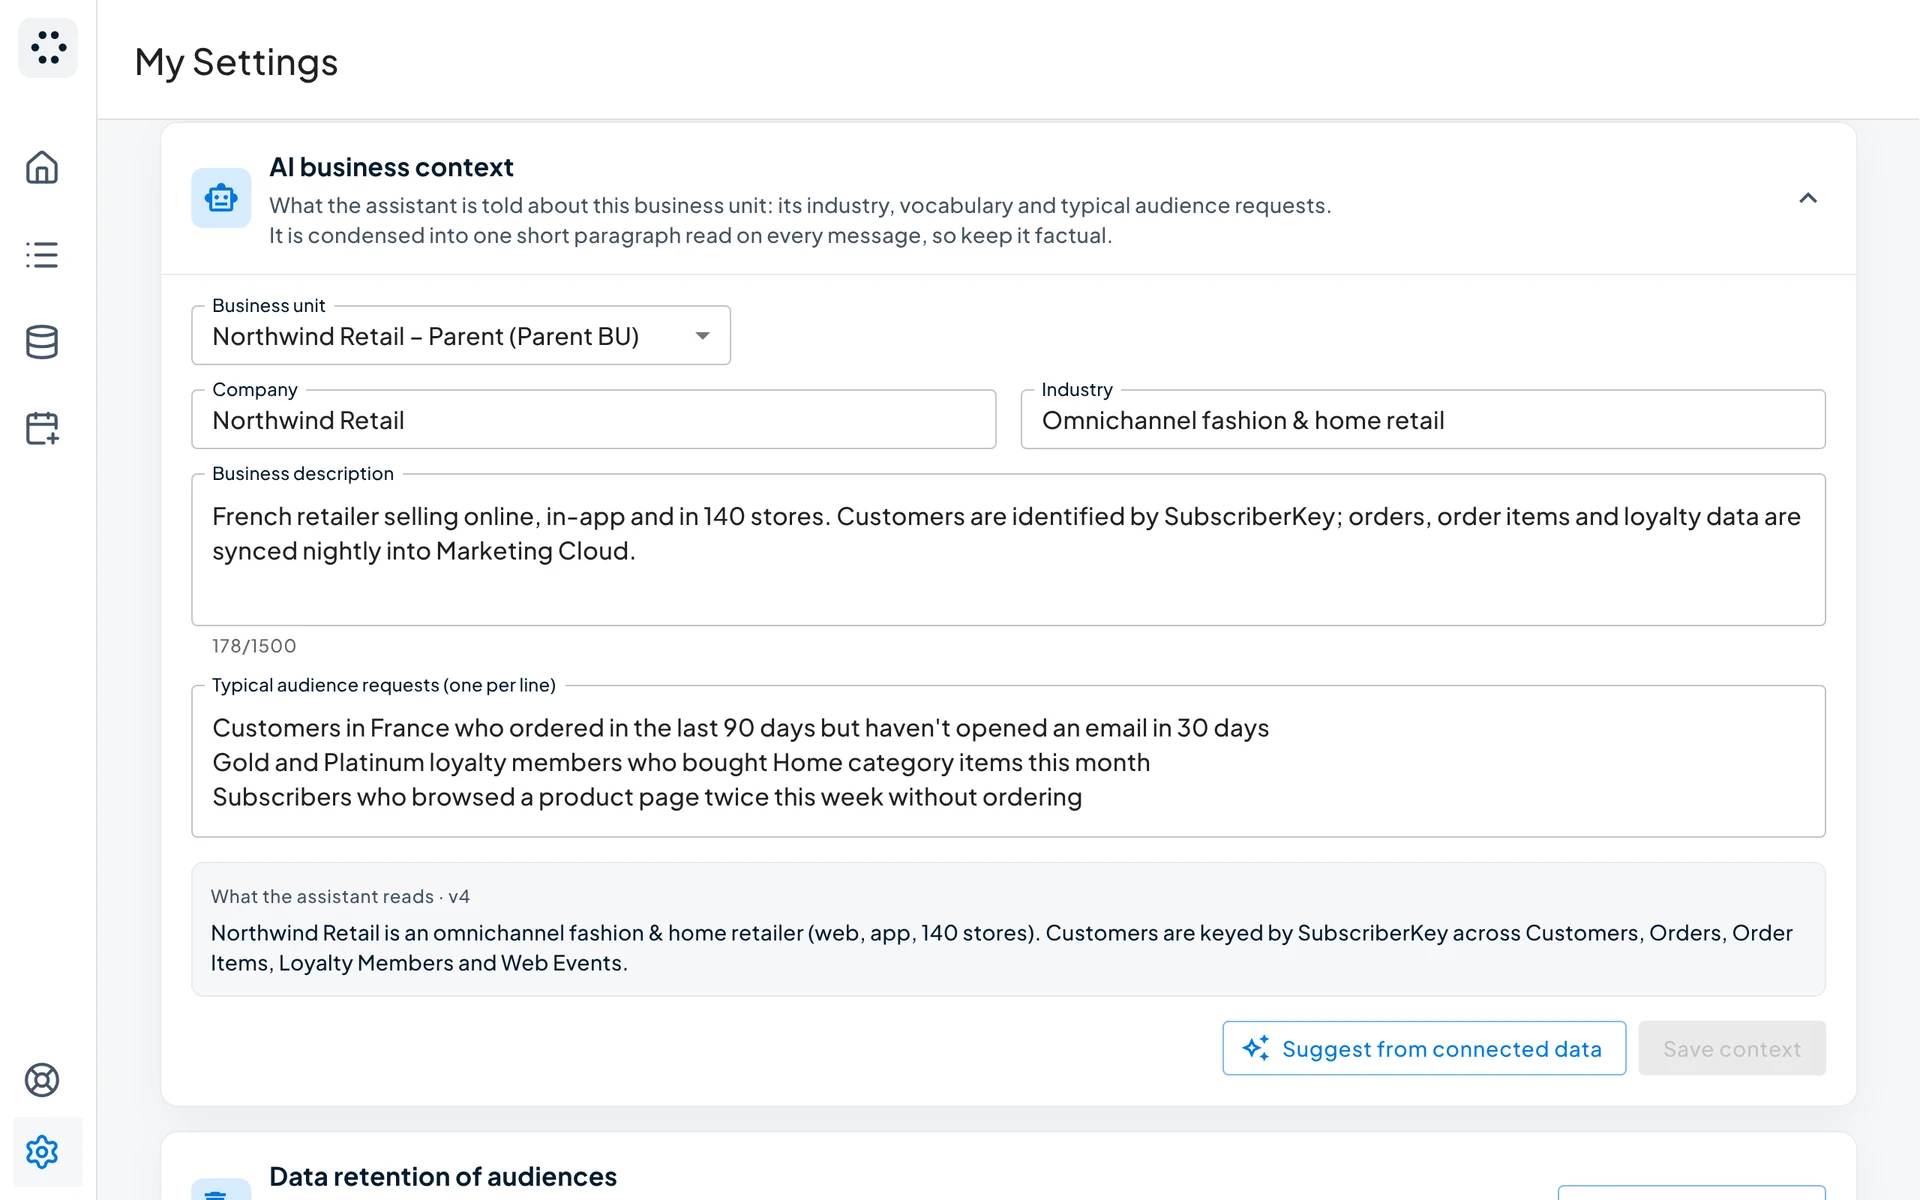
  1. Select the business unit, if you have more than one.
  2. Click Suggest from connected data to get a first draft based on your connected Data Extensions.
  3. Review Company, Industry, Business description and Typical audience requests.
  4. Click Save context.
QAiry Settings, AI business context: business unit selector, Company, Industry, Business description and Typical audience requests fields, a preview of what the assistant reads, and the Suggest from connected data and Save context buttons
AI business context. Below the form, QAiry shows the short paragraph the assistant actually reads.

Do this after step 7, because the suggestion is based on the Data Extensions you connected. Only an Administrator can edit the business context.

10

Assign roles to your team

QAiry: Settings, Manage your users

There is no invitation to send. A user appears in the list after opening QAiry from Marketing Cloud for the first time.
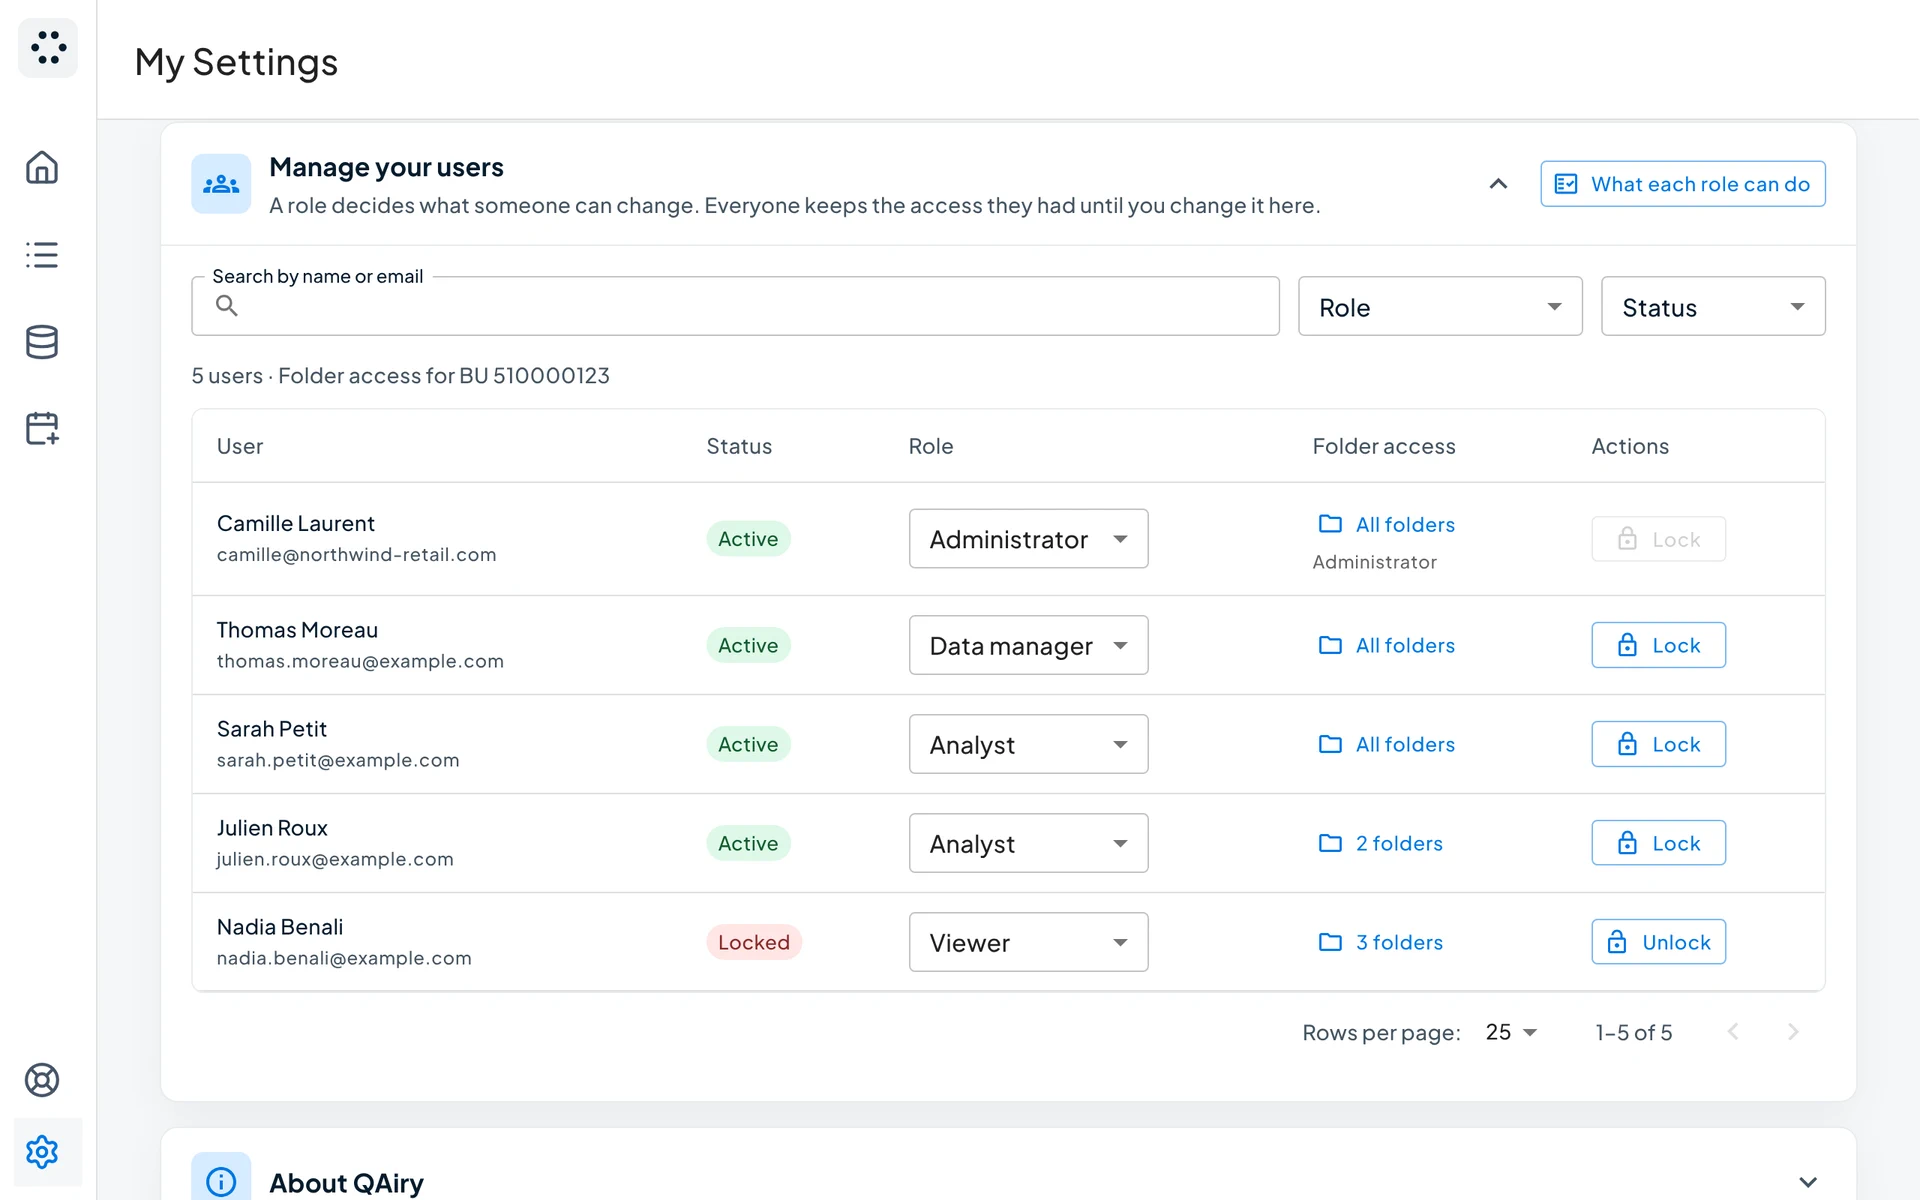
  1. Ask each teammate to open QAiry once.
  2. Choose a Role for each person: Administrator, Data manager, Analyst or Viewer.
  3. Use Folder access to choose whether a person works with all folders or only the ones you select.
  4. Use Lock for anyone who should no longer have access.
QAiry Settings, Manage your users: five users with their status, a role selector, their folder access and a Lock or Unlock button
Manage your users. One row per person: status, role, folder access, and Lock or Unlock.

See what each role can do below.

11

Build your first audience

QAiry: Home

Your environment is ready. Describe the audience you need in plain language and QAiry generates a Data Extension preview. You can build the same audience in three ways and switch between them:
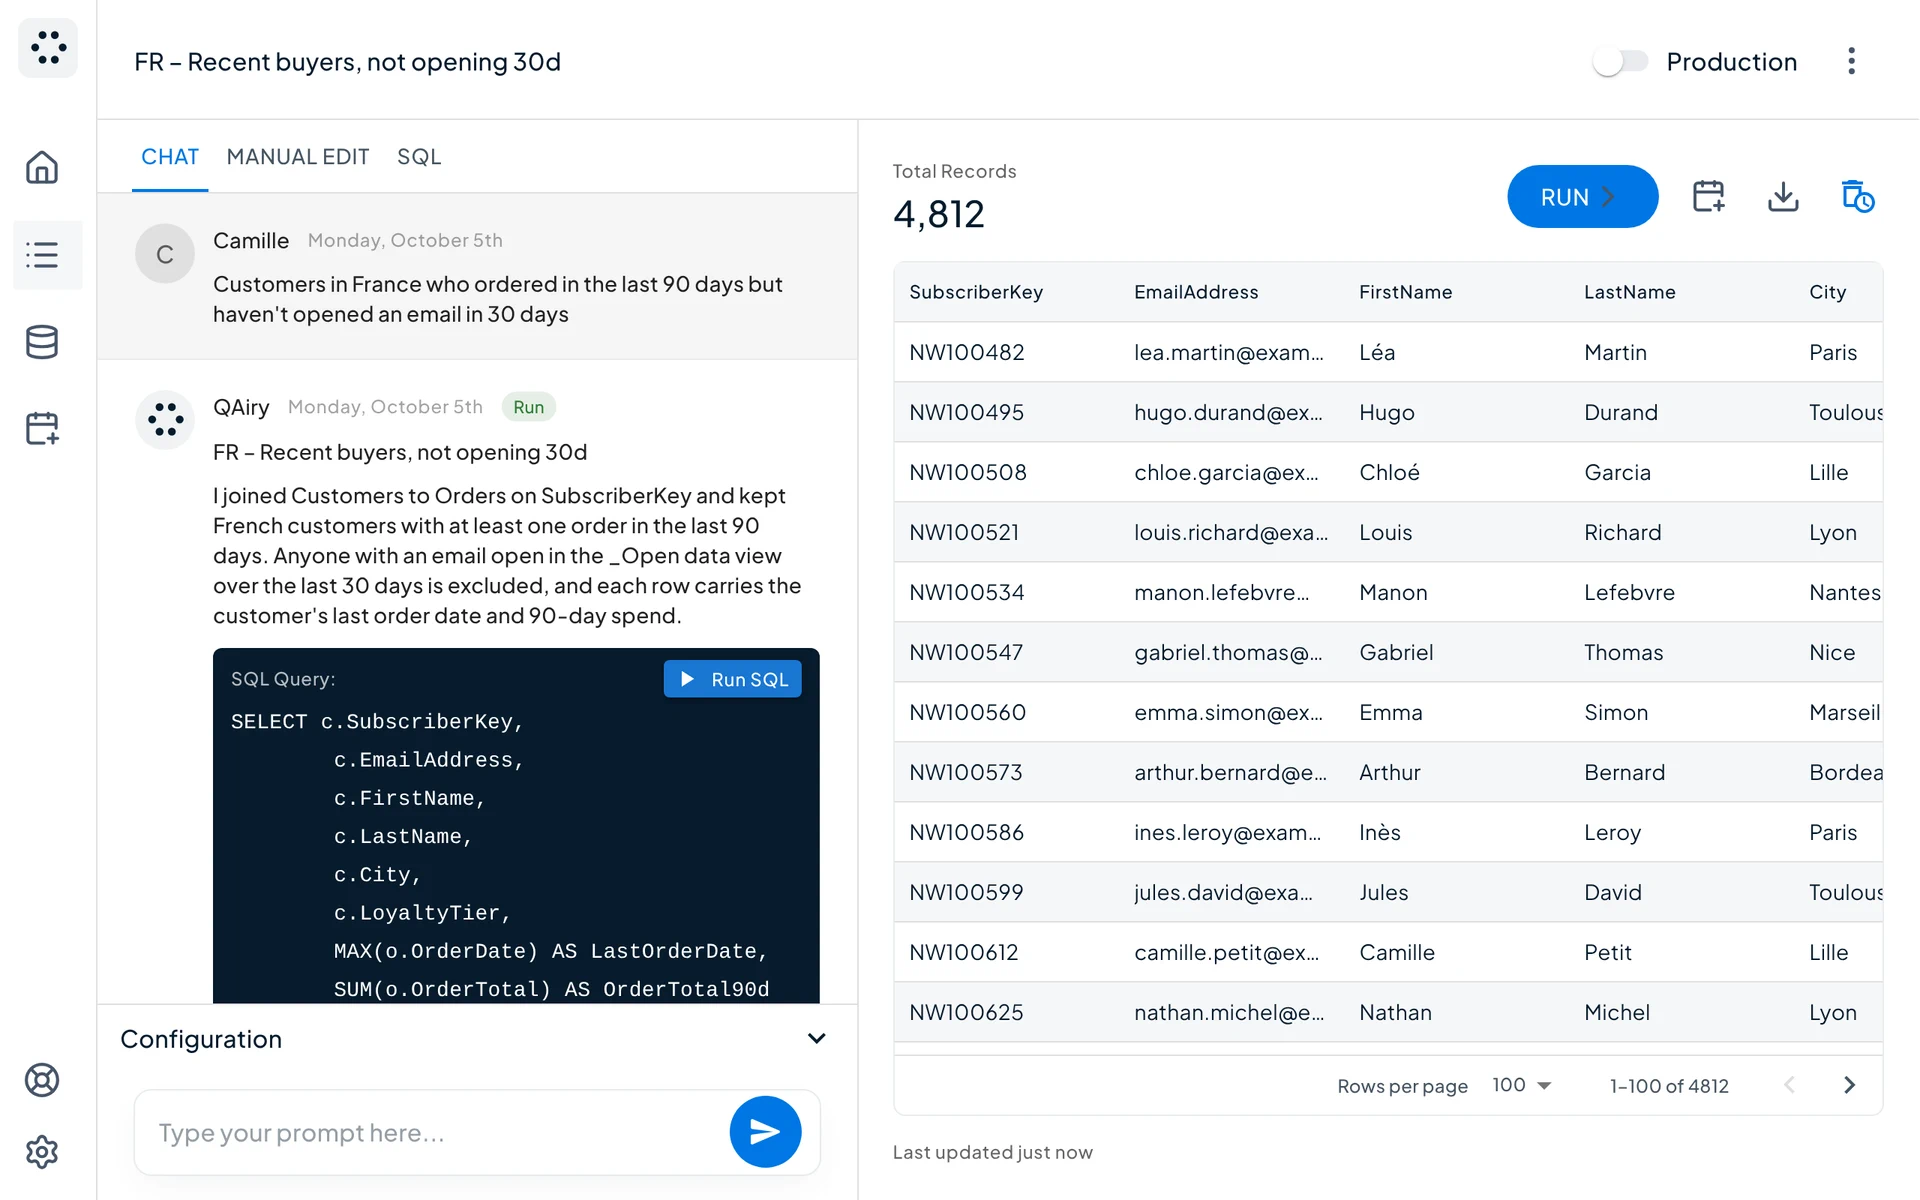
  • Chat: write your request and refine it in conversation.
  • Manual Edit: select Data Extensions, define joins and apply filters visually.
  • SQL: review or adjust the query by hand.
QAiry audience built from the chat: the request in plain language, the assistant's explanation and SQL on the left, and a preview of 4,812 records on the right, with the Chat, Manual Edit and SQL tabs
From request to audience. Your request and the generated SQL on the left, the record count and a preview of the Data Extension on the right.
12

Schedule it

QAiry: Automations, Create automation

Keep your audiences up to date with a schedule. Choose how it runs:
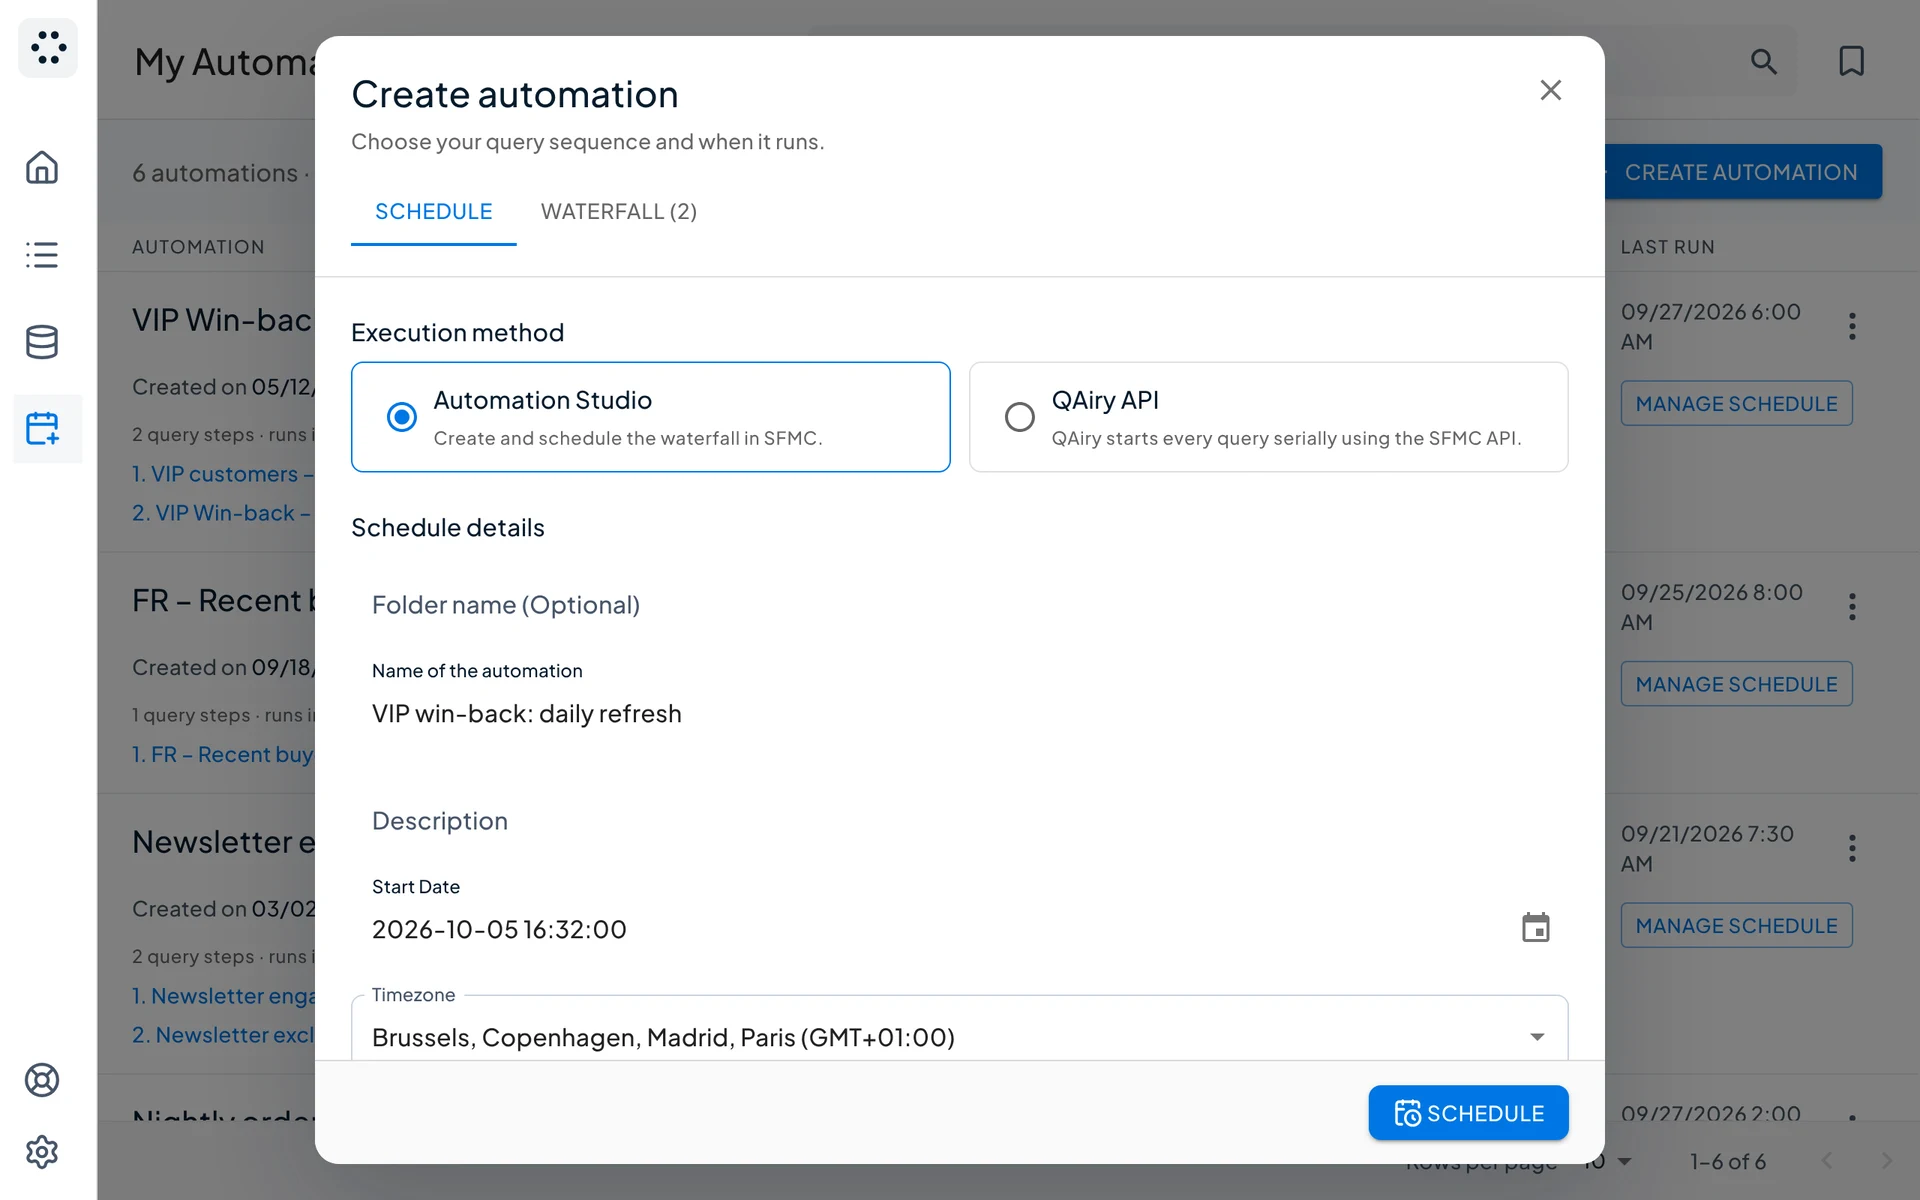
  • Automation Studio: QAiry creates and schedules the automation in Marketing Cloud.
  • QAiry API: QAiry starts every query one after the other using the Marketing Cloud API.
QAiry Create automation, Schedule tab: execution method with Automation Studio selected, automation name, start date and timezone
Schedule tab. Pick the execution method, name the automation, then set when it runs.

Then set the start date, the timezone and the frequency: once, hourly, daily, weekdays, weekly, monthly or yearly. In a waterfall, a step starts only after the previous query succeeds.
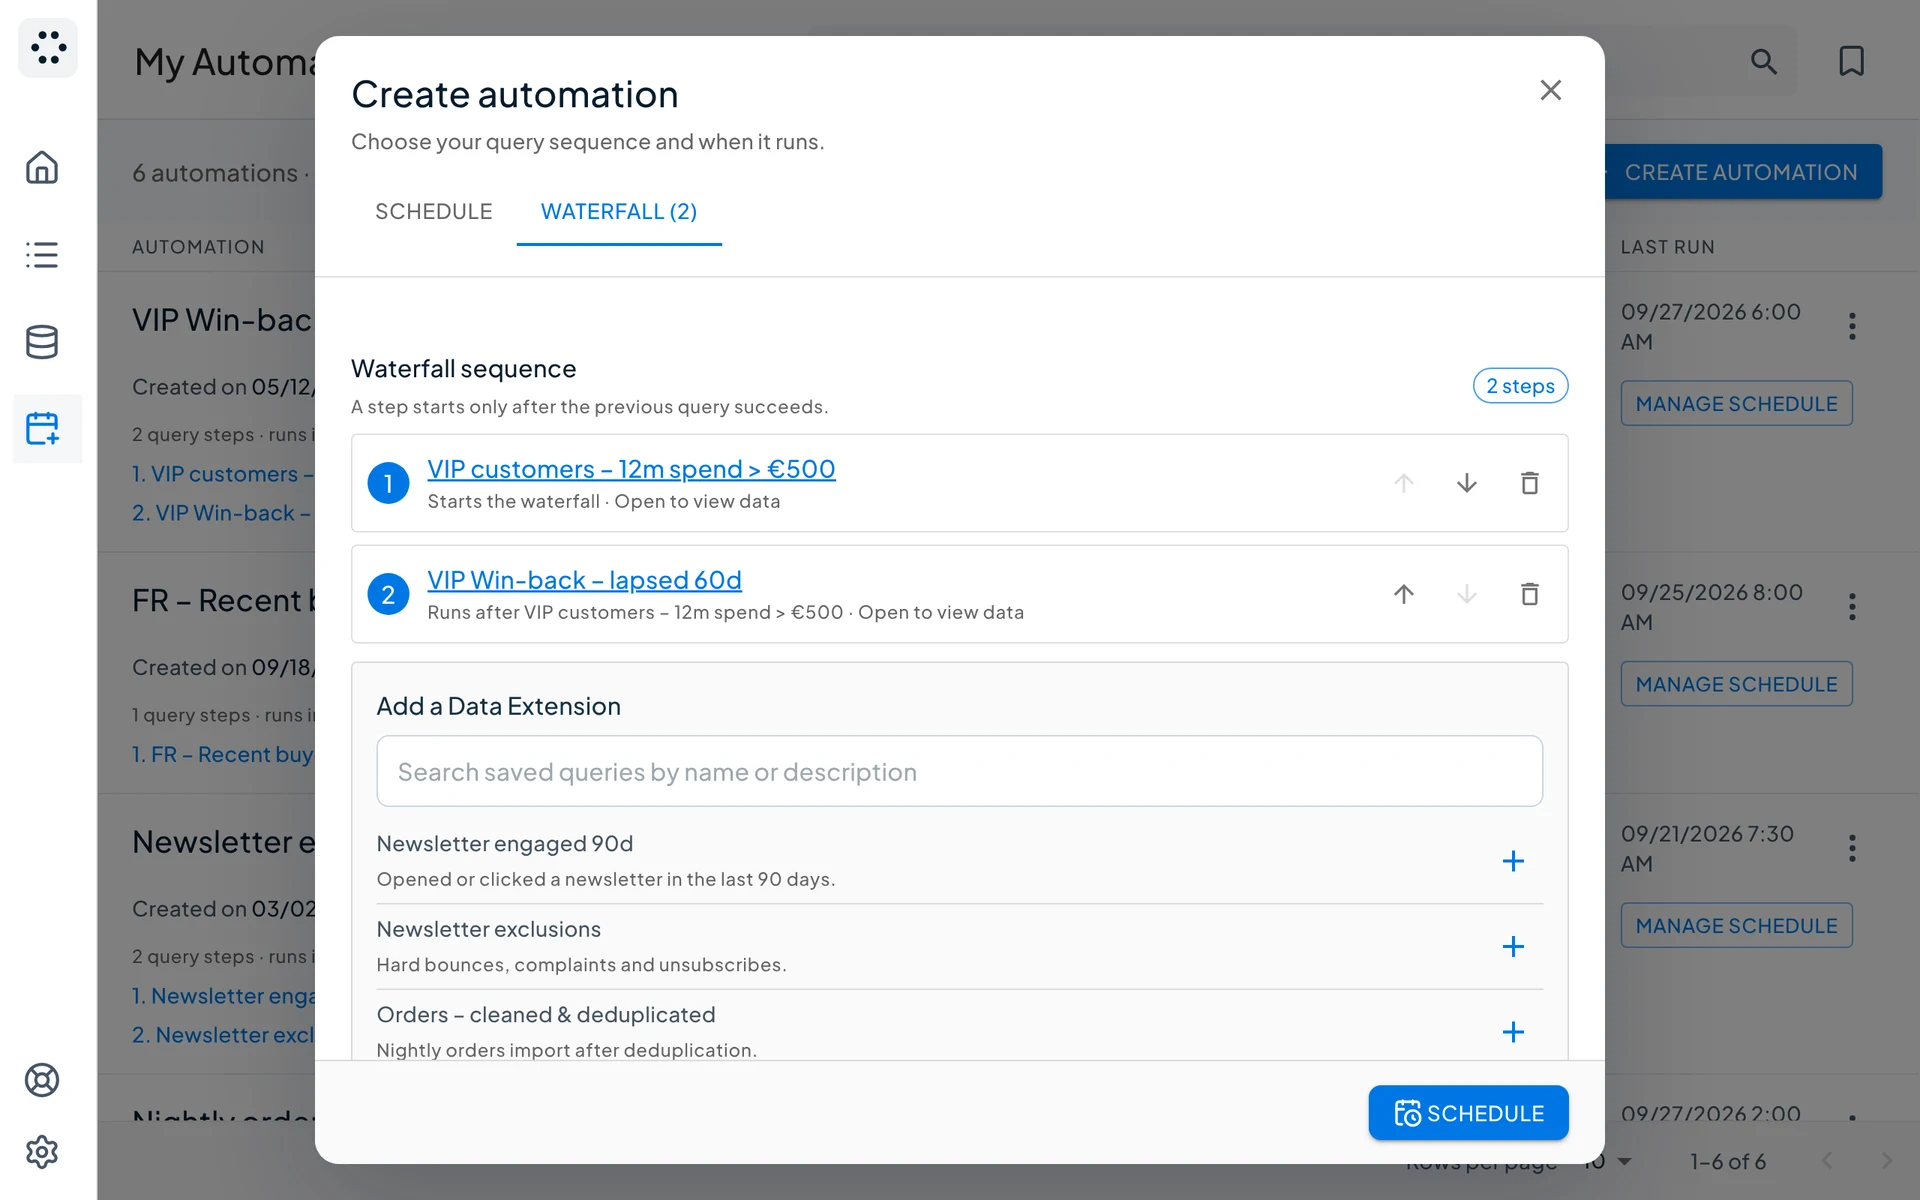
QAiry Create automation, Waterfall tab: a sequence of two query steps in order, with a list of saved queries to add
Waterfall tab. Add your saved queries and put them in order. Add at least one before you schedule.
User roles

What each role can do

A role decides what someone can change. Everyone can see audiences and chat with the assistant.

Administrator

Full access, including users and business units.

Data manager

Manages connected Data Extensions and relationships, and builds audiences.

Analyst

Builds and runs audiences, but cannot change the data model.

Viewer

Can look at everything and change nothing.

CapabilityAdministratorData managerAnalystViewer
See audiences, results, the data model and relationshipsYesYesYesYes
Chat with the assistantYesYesYesYes
Create, edit, run and delete audiencesYesYesYesNo
Connect, describe and remove Data ExtensionsYesYesNoNo
Create, edit and delete relationshipsYesYesNoNo
Change roles, lock and unlock usersYesNoNoNo
Business unit settings: AI context, default timezone, parent business unitYesNoNoNo

A user who has never been given a role counts as a Data manager. The last Administrator cannot give up the role.

Troubleshooting

Common setup questions

I do not see QAiry in my Marketing Cloud menu
Check the package access in Marketing Cloud under Setup, Installed Packages, QAiry: your user must have access and the business unit you are in must be enabled. Then refresh Marketing Cloud.
QAiry shows "Access denied" when I open it
Your user or business unit is not authorized yet. Ask your Marketing Cloud administrator to check the package access (steps 3 and 4), and make sure QAiry was opened from the parent business unit first (step 5).
My shared Data Extensions do not appear
No parent business unit is set. In Settings, Manage your business unit, click "Set as parent" on the business unit that holds your shared folders.
A teammate cannot connect a Data Extension or create a relationship
Connecting Data Extensions and saving relationships needs the Data manager or Administrator role. An Administrator can change the role in Settings, Manage your users.
The AI does not use one of my Data Extensions
Check that the Data Extension is connected and switched on in Datamodel, Synchronized, and that it has a clear description. If you limited your request to group tags, check that the Data Extension carries one of the selected tags.
I added or renamed fields in Marketing Cloud
Open Datamodel and click "refresh". QAiry reloads the folders and re-reads the name, description and fields of each connected Data Extension.

Need a hand with your setup?

Book a session with our team and we will set up your environment with you, from the package to your first audience.